

When my children were little,
I always made sure they
had a little Easter Basket
in their rooms beside their beds
on Easter morning...
Sometimes when money was really tight,
I would have to come up with a quick,
affordable and cute idea...
This is one of them.
Keyword here...QUICK.
Sew, in that spirit...
Just go with it.
I promise it will be fun
and you can do this within an hour.
Like I said, back in the day...
money was used for other things...
you know...
FOOD....
so, I had to look around my house for
something to begin with....
and I had a set of these:

That's right...an ordinary quilted placemat.
It was already quilted.
TIME SAVER!!!!

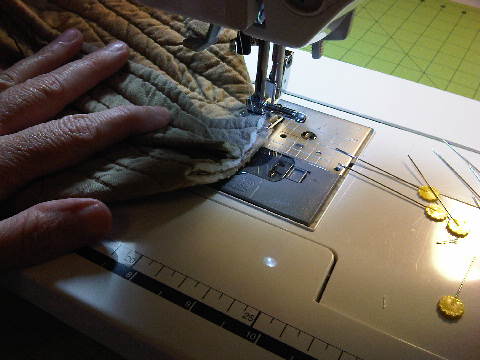
Fold it in half, right sides together and sew down both sides.

At the bottom,
Cut 1 inch up and 1.5 inches from the side.
It should look like this.

Take the corners and fold horizontally
and it forms a straight line.

You are going to sew 1/4 in from the edge on both
sides across that straight line.
Your placemat has a great little box shape.

It is time to turn it right side out.

BAM!
I told you it was QUICK!

From here, you can take as much
or as little time as you want.
You don't even have to add the lining!
You can just fill it with the Easter grass
you can buy at Wal-Mart for 25 cents a bag!!!

If you do want to add a lining, then cut your fabric
the width and length of your placemat.
Go ahead and cut out your handle and fold it over
a couple of times and then sew.


Go back and make all the same cuts and
sew the sides like before.

fold and sew your straight line.

Attach your handle on both sides with a
straight seam.

Slip your lining in.

Fold down the top 1/4 inch and either sew
on your machine, or if you don't want a line
on the outside, just hand stitch it into place,
covering your handles.

I decided to decorate mine tonight...
so I simply drew out an egg
and after I added my heat bond,
I traced it on the bonding paper and cut it out.

I did the same for my bunny.


I stitched my bunny into place and hand stitched my eggs.


I left enough of an edge on my bunny so I could cut
the edges to give it a little depth.

The tail was a little trick my mama taught me to
make bows. I wrapped my thread around my
fingers until I had what I thought would be
a fluffy enough tail and tied it in the center between
the two sets of loops.

Once it was tied, I simply cut the loops and
fluffed out my little bunny tail.

I attached it and tied it off.

I added the little eye, and I was done!
With all my extra steps it still only took me about
two hours!!!

And there it was...

I hope you will give it a try...
and go ahead! USE THOSE OLD
QUILTED PLACEMATS!
It will be your little secret!
Happy Sewing!

Your 'bunny' bag is sEw sweet...I will be making a few of them...for sure!! Thanks for sharing Lana, have a great day and a wonderful weekend...I'm going out to tackle the snow....there is more to come ugh!! :-D
ReplyDeleteSuper cute too!!!!!
ReplyDeleteUntrue how talented you are. That bag is just the cutest.
ReplyDeleteLove
P xxx
Okay....
ReplyDeletecan I come over & play?
I know that you have more idea's! :)
I love this & who'd of guessed?
(so easy) I will not tell! lol!
A cleaver way to use up the older place mats that
you dont know "what" to do with!
Have a wonderful weekend :)
Blessings~
Lori
P.S. I am looking to use up older linens?
you know dresser scarfs that a friend gave me?
Some have lil-older holes however some are in very very good use-able condition? Be thinking Lana? :)
Cute idea. I don't have any easter baskets to make but if I did...
ReplyDeleteWhat an adorable idea, Lana!
ReplyDeletetoo cute!! love the bunny's little tail!
ReplyDelete